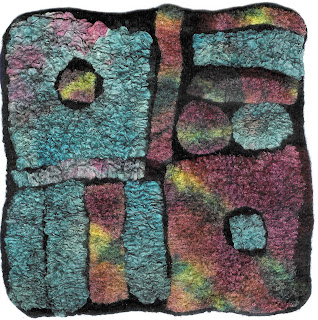
I want to use the method Pam talked about in the class which I've never had a chance to try. As I understand this method, a ground cloth of fine silk gauze is laid on the work surface. Then two thin criss-crossing layers of 19 micron merino top are laid on the gauze. This wool will act like a glue to attach to the cut up pieces of laminated prefelt that are laid on top. The prefelts are put onto the loose wool with their wool side facing down and the silk side up. When these felt together, the loose wool has grabbed both the base fabric and the cut up collages pieces of prefelt. So far, in my first sample, this worked like a charm! When I choose the laminated prefelts I was going to cut up for the samples, one of than prefelts was more felted than the other. I thought this might be a problem, but it wasn't. I also made sure to choose a laminated prefelt that was made with silk gauze and one made with habotai, to see if the different fabrics would make a difference. They both seemed to work well.
The Resist Dyed, Laminated Prefelts
Here are the laminated prefelts that I resist dyed. In the photo above, the pieces on the right are showing the silk gauze side of the prefelt. The pieces on the left are habotai. The bottom picture shows a prefelt with the silk gauze side showing.
The first collage sample was laid onto a black silk base with black fiber. I was very happy with the sample, but I am making a second one, with bands of differently colored wool so I can see if I like one of these colors better with my dyed prefelts.
The Samples for the Vest
Finished sample on left. The sample shrank from 10 inches square to 7 inches.
In process sample on right.
Detail of sample in process.
Larger view of sample one (black background).
Sample two (blue, olive,purple background).
(NOTE: This photo doesn't show the purple background very well. On my monitor it looks brown but it's really a nice dark purple.)
Layout of sample three.
Sample three finished (cyan, burgundy, plum background).
(NOTE: The blue should be more turquoise.)
So, after looking at the samples, here's what I've learned:
1. I do like the black one the best.
2. With the other colors, it seems like the darker colors worked best with the colors I used in my dyed prefelts. I don't think the middle value colors worked as well. Although, doing a color run with one color carded into another for the background might be interesting.
3. I think in the vest, I will use larger pieces of laminated prefelts. The smaller pieces start to look chaotic to me. I do like cutting into the larger pieces and then floating another design in the negative area.
4. The closer to the edge the laminated prefelts are put, the more difficult it is to control the shape of the edge. Because the prefelts don't shrink at the same rate as the rest of the felt, they push out the edge. This could be a cool design element through- something to think about- maybe along one front edge of the vest.
5. In my dyed laminated prefelts, I tried very hard to not have a lot of color contrast. I worked at getting rid of most of the yellow from the first dyebath. But after felting, the yellow is much more subdued and it is helps to give some life to the rest of the colors. Any subtle differences between the colors became even more subtle.
6. I didn't think I was going to like the shapes made from the habotai/wool prefelts. In the prefelt stage, the colors weren't very strong. In that stage, the gauze showed up more color. But after felting, the habotai gathered into a wonderful texture and the dyed colors condensed together. Also, the sheen of the silk habotai helped the colors appear richer. The silk gauze had a duller appearance and its texture was much finer so it had a much flatter appearance in the samples.


.jpg)


